Diablo 4 PC Optimization and Benchmarks with Ray Tracing
Here are the best graphics settings for Diablo 4, including ray tracing, optimized for your PC.

Diablo 4 is the latest installment in the long-running series of action RPGs made by Blizzard Entertainment, released simultaneously on consoles and PCs back in 2023. Unfortunately, it requires one of those pesky launchers separate from Steam to make it run but is generally a well-running PC port, with issues patched out over the year. (The textures and VRAM issues however still exist). With the Game Pass released and ray-tracing added, let’s check out the best graphics settings for Diablo 4 on PC. (And if those ray-tracing features are even worth it in this game.)

We’ll go through each setting tested with frame-rate graphs and the recommended option you can pick based on your PC’s power level (defined near the end of the article). We’ll also leave the suite of settings to pick in a handy chart at the end you can skip to if you’re in a rush.
Let’s start by looking at the official PC requirements.
Diablo 4 Official PC System Requirements
The official PC specs are modest. You can run the game with an Intel Core i5-2500K or AMD FX-8350, both CPUs over a decade old. Paired with an NVIDIA GeForce GTX 660, Arc Radeon RX 470, or AMD Radeon R9 280, also more than a decade old. Coupled with 8 GB RAM for 1080p 30 FPS at “Low” graphics settings.
For 1080p “Medium” settings at 60fps, a Core i5-4670K or Ryzen 1300X coupled with a GeForce GTX 970, Arc A750 or Radeon RX 470 and 16 GB RAM should do the trick. Both configurations require an SSD with 90 GB of space to boot and a persistent internet connection.

Our Test Bench
- CPU: Intel Core i7-14700KF.
- Motherboard: GIGABYTE Z790 Gaming X AX.
- Cooler: Asus ROG Strix LC II 360.
- GPU: NVIDIA GeForce RTX 4080 Super.
- Memory: 16GB x2 DDR5-6000 CL36.
- Power Supply: Antec HCG 850W.
In the coming sections, we’ll go through each setting under the “Graphics” tab in the game’s options. The other tabs do not affect the performance. (There is a noted exception for the “cross-play” option, which we’ll see later)
The very first thing is the Display. Diablo 4 does not provide a native fullscreen option, and the only options are “Windowed” and “Windowed (Fullscreen)“. The latter option is recommended here, and it will default to your display’s resolution.
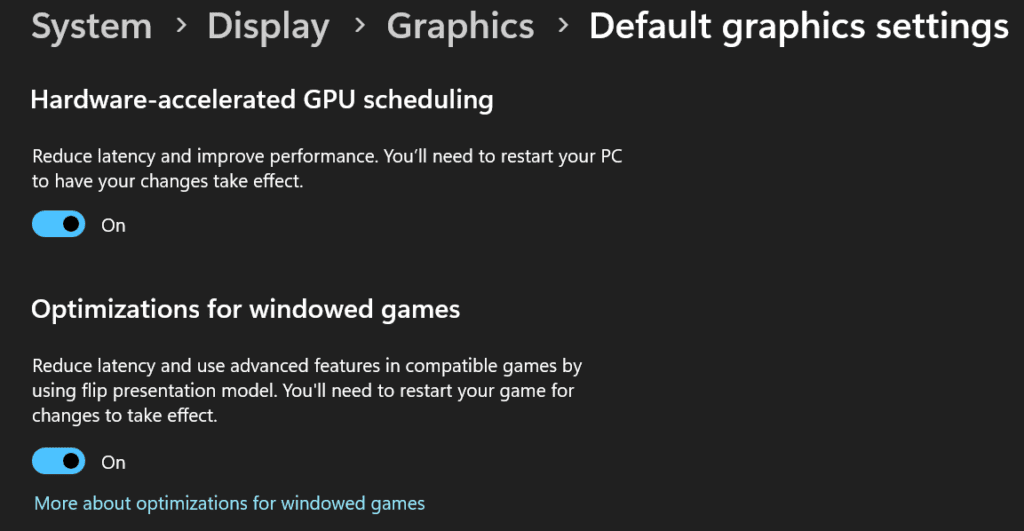
Make sure you have “Optimizations for windowed games” enabled in your Windows settings as this will help out with latency and other features here. To get there, open System Settings (Right-click on the Windows logo and click settings) -> Display -> Graphics -> Default graphics settings and enable both options.
Make sure you have the correct higher-performance GPU selected if you have an internal GPU in your system, in the “Adapter” setting in the game. Once that is done, we can move on to the other settings starting with the resolution first.
Also, to see the in-game FPS counter on Battle.net, hit “Ctrl+R” while in the game.
Resolution Scaling: 1080p vs. 1440p vs. 4K Benchmarks

Changing resolutions is the first thing to do when optimizing a game. Generally speaking, a higher-end system should target 4K, mid-range 1440p, and low-end 1080p. (Our definitions for these PC levels are given at the end.)
Benched at the highest preset, “Ray-Tracing Ultra”. Here, on switching from 4K to 1440p, the performance increases by 89%, and from 4K to 1080p, it increases by 159%. From 1440p to 1080p, that’s a 37% increase. The age-old adage is of course true, lower resolution means bigger frames.
Best Graphics Preset for Diablo IV (+Ray-Tracing)
Once the target resolution has been selected, we can start with optimizations to increase our frames. Let’s take a look at the game’s default presets and how they function first. The following has been done at 4K as a reference point.
Diablo 4 has four presets going from “Low”, “Medium”, “High” and “Ultra”. As of the recent ray-tracing update, it now includes four additional presets, simply adding “Ray-Tracing(RT)” in front of the existing ones, thereby taking the total presets to eight. Let’s see how they stack up. (Note that no upscaling features such as DLSS or frame generation have been turned on yet, we shall look at those separately later.)
The GeForce RTX 4080 Super (and the Core i7-14700KF) manage an average of 46.5 FPS at the 4K “Ray-Tracing Ultra” setting in Diablo 4.

As we can see in the graph, the “4K Ultra” preset, that is without RT, sits in between the “4K RT High” and “4K RT Medium” presets at a sweet 107.3 FPS. That’s a huge leap in frames by just keeping ray-tracing off, and this is on an NVIDIA RTX GPU to boot. The results would look even better on AMD GPUs which generally have worse ray-tracing capabilities.
The following are the presets ranked in percentage gains going down from the “4K RT Ultra” preset:
- RT High: 21.5%
- Ultra: 131%
- RT Medium: 154%
- High: 233%
- RT Low: 250.5%
- Medium: 290%
- Low: 317%
Keeping all ray-tracing off is the way to go if you need to optimize frames, especially since as we shall see, the top-down nature gives not much benefit to ray-tracing in this game. Try out the preset that nets you your target frames (be it 30, 60, or higher) and then we shall proceed to toggle each option to maximize frames in the coming sections.
All the following tests are done with RT off, as RT on doesn’t allow us to see the minor differences in frames.
Diablo 4 VRAM Usage and Texture Quality
Texture quality determines how detailed an object looks on the surface by changing the resolution of the loaded textures. This determines how much VRAM (GPU’s memory) is needed. Unfortunately, Diablo 4 has some of the worst texture optimizations in recent games. For reference, the PS5 version runs at the equivalent of the “Ultra” preset here. And the Ultra preset according to the game, needs at least 32 GB RAM, but most importantly around 15-16 GB of VRAM.
Most GPUs, especially from the NVIDIA side, come with lesser VRAM, such as the 4070 with 12 GB. Our 4080 Super has about 16 GB. What makes this bad is that any setting below high looks low quality on screen, some resembling PS2-era textures.

There is unfortunately no way to get around this unless you have higher VRAM, as keeping a higher texture setting WILL result in stutters during gameplay. The quickest way to check your available memory is through the Task Manager -> Performance -> GPU. If you have 16 GB, you can afford the Ultra Textures. A 12 GB card can handle up to High, 8 GB for Medium, and anything <8 GB will be Low.

We hope the upcoming GPU generations increase the available VRAM or better-optimized textures. (Since consoles have shared memory, the whole reason they’re able to handle this and not PCs)

There is also a noticeable FPS boost in turning down the textures, but keep this setting at the maximum possible one based on your memory as we’ve seen before.
Anisotropic Filtering
Anisotropic filtering usually helps make distant objects look sharper, especially ones at an oblique angle to the camera. Without it, you’ll notice blurriness in textures farther seen farther away. Diablo 4 is a mostly top-down game and as such, the effect of AF is negligible both in looks and the performance impact.

Keep this one on 16x. (Ultra Preset)
Shader Quality
This is a bit of a unique setting to this game, and the description is pretty vague, simply stating that it “controls the quality of visual effects on a case-by-case basis”. What I assume this means is that some surfaces or effects will look better. In general, shaders are small programs that run to help calculate certain aspects of graphics such as pixels and how they’re represented. Definitions aside, this setting has no impact on the performance as we can see below.

Keep this one on “High” (Ultra preset).
Geometric Complexity
This setting controls the level of detail by changing the polygon count in the meshes of the objects in the game. This affects the 3D depth detail of items, which is different from texture quality. A lower setting equals lower details in objects further away.

This is another setting that doesn’t really impact the performance much due to the top-down nature of the game but can have noticeable visual trade-offs in some places. Keep this one at “High” (Ultra preset). (We can even see the medium setting looks lower than high here, which is due to normal fluctuations in frame rates, ergo they’re all the same in performance metrics.)
Terrain Geometry Detail
Similar to the previous setting, but for the terrain itself instead of objects on the terrain. Once again, due to the top-down nature of the game, there isn’t really much terrain to be seen “in the distance” and hence, not much of a performance difference.

As seen above, the FPS difference is negligible. Keep this one on “High” (Ultra Preset).
Clutter
The clutter quality in this game controls the density and distance at which ground clutter items, like grass and foliage, are placed. The higher the setting, the more the clutter-items and also a higher distance of render. The highest setting also enables shadows from clutter which is missing on the lower ones.
In our run below, there is practically no difference in frames. Note that this is because the benchmark was done in an area with no grass. This does however indicate that in most areas, the difference is negligible. The difference in the visuals is also significant, with “off” completely removing grass.

Keep this one at “Highest“. If you run into an area with lots of grass or are struggling with frames after changing all the other settings too, turn this down to high as that will disable shadows, or even medium to further get frames in the grassy areas.
Fog Quality
This setting controls the quality of the presentation of fog in the game. Here, going from High to Low nets us a 1.5% increase in frames. This is one setting that can be turned down to save on frames as the quality of fog in normal gameplay during our tests doesn’t change much, unlike the previous options where clutter, textures, or geometric details drastically alter the visual presentation. For that reason, this one an easy one to turn down for a few quick frames at no visual loss.

There is not much difference between Medium and Low as seen above, so keep this at “Medium“.
Fur Quality
Fur quality controls the level of quality of fur on player equipment, enemies, and the environment. In our tests, the fur quality changes did not change the average FPS but it did improve the 1% lows. This means that unless you have some armor with fur or enemies with fur, this setting naturally doesn’t impact frames much.

It is recommended to keep this at the “High” setting in normal gameplay unless you are facing a particularly fur-heavy boss.
Reflection Quality
As the game puts it, this controls the “quantity of reflection probes in the world”. This setting doesn’t seem to impact the performance much at all, and as such we recommend keeping this one at “High.”

Screen Space Reflections
Screen Space Reflections (SSR) are the reflections from objects visible on the screen, using screen space information. This means that anything outside of the view of the camera is not reflected. Once again, for a top-down game, this means that most things are outside of the view of the camera constantly and the reflections suffer in this setting.

Keep this “On“.
Anti-Aliasing Quality
Anti-aliasing is used to smoothen jagged edges, most noticeable on the borders of objects as “jaggies”. Turning it on helps smoothen those edges out and makes the image look more cohesive at the expense of a slight blurriness.

This one has no performance impact, keep it at “High“.
Ambient Occlusion
To put it simply, ambient occlusion is the soft shadows and indirect lighting from the environment. Originally, Diablo 4 had the “SSAO” option but now it’s been changed into a simple “Ambient Occlusion” option with the explanation stating it’s using GTAO.
The performance impact here is MASSIVE. Further adding to the fact that there is not much loss in visual fidelity as the difference is barely noticeable.

Going from Ultra to High gives us a healthy 38% boost, to Medium a 47% and Low a 49% boost respectively. Turning it off gives us a massive jump of 57%. Keep this one “Off“. If you turn it on, there is not much difference between Low and Medium, but do not go higher.
Shadow Quality
Shadow quality controls the resolution and quality of the shadow maps used in-game. As of the current update, this setting controls both the dynamic shadows for objects as well as the sun-casted environmental shadows. Low and Medium create low-resolution terrain shadows, while the unit shadows are upped from blobs to dynamic shadows near the player. High turns it into high-quality dynamic shadows for the entire scene, while highest further increases the shadow map quality.

Going down from Ultra, we get a 2% boost at High, 2.7% at Medium and 3.2% at Low. Keep this at “High” to get the best of both dynamic and high-quality shadows. Turn it down to “Medium” if you need more frames.
Contact Shadows Quality
Contact shadows improve the shadow quality and accuracy. They calculate the screen space lighting on a per-pixel and per-light basis. Consequently, it’s more taxing in areas with more light sources. Here, the low setting enables contact shadows only on player characters, Medium adds it to town characters and mounts, and High enables it for monsters as well. In our tests, there is no difference in the FPS in the scenes tested.

Keep this one at the “High” setting.
Particles Quality
This setting adjusts the particle density and consequently the “detail” of particle effects, such as the ones from attacks, fires, or even rain and snow. The frame gain from Ultra to Low is a negligible 1% with Medium not even exhibiting any gains.

Keep this one at “High“.
Water Simulation Quality
This setting according to the game’s description determines the size of the texture used to simulate water, which means it is not actually a CPU but rather a VRAM-bound thing. Considering the already existing issues with the texture quality and VRAM, and the negligible difference in actual simulation, keep this one at “Low” to avoid stutters in water-heavy scenes.
Physics Quality
This setting determines the “realism of colliding objects and gravity”. Consequently, this is a CPU-intensive setting. In our test which involved running around a town area, this was not affected. However, during heavy combat or other scenarios with destructive objects, this will definitely cause issues, especially on older CPUs.

Keep this one at “High“. If your CPU is very old and you notice frames dropping after trying other settings, turn this down to “Low” to avoid stutters in heavy scenes.
Distortion
This setting is basically a heat distortion effect, around heat-emitting objects such as fires, similar to the heat haze effect. Turning this off netted a boost of almost 4%. This is a good one to turn off for frames. with negligible impact on visuals.

Keep this “Off“.
Low FX
This setting is exclusively placed here to heavily reduce the number of rendered particle system effects to help increase performance. Turning it on netted us a boost of 3% in a non-battle scenario with just snow effects.

Consider keeping this “On” if your PC falls in the low-end range, otherwise keep it off.
Ray Tracing Effects Explored
Finally, we get to the ray-tracing settings, very recently implemented into this game. Is it worth the performance impact? Let’s try out the different settings first and see how they perform and look.
Ray Traced Shadows Quality
Turning on RT Shadows has a huge impact on performance. Curiously, the “RT Shadows Low” setting nets us higher frames than RT off. The rest, however, display massive frame drops.

Going from RT off to Low gives us a 2% increase in frames. Going further to Medium, we get a 15% drop in frames, and going to high, a whopping 50% decrease in frames.
When looking at the gameplay, sure the ray-traced shadows look neat when seen, but it’s largely negligible in the grand scheme of things for a top-down game and the performance hit is vastly not worth it. As per the game, Low gives us RT sun shadows, Medium gives us sun and player light RT shadows, while high gives us RT shadows for all lights.
If you want to enter the RT realm, get ready to use the upscaling options we’ll look at in the next section. Otherwise, keep this “Off” or at “Low”.
Ray Traced Reflections Quality
This setting determines the realism of ray-traced reflections. Low gives us single-ray reflections with approximated blur from rough materials and high gives us multiple-ray reflections with accurate blur from rough materials. Once again curiously, RT Low gives us fewer frames than RT High here, but both suffer frame losses compared to RT Off. Off to RT high is a 13% drop and RT low is a 14% drop.

Once again, if you wish to use RT effects, which can look good when there are a lot of lights at play, over here it can be kept at the “High” option as there is no difference between the two options. Be mindful of the 14% drop in frames though.
Ray Traced Foliage
This setting enables ray tracing against trees and other foliage, which includes both reflections and shadows. Keeping RT shadows and Reflections on the High setting with Foliage RT off, gives us 47.8 FPS while turning on Foliage RT gives us 45.3 FPS here, a whole 5% drop.

When coming to this setting, the logic would be that we’ve already sacrificed a huge number of frames by keeping RT on, keeping this on for a little 5% drop will not hurt. This setting is only applicable if any RT option is first turned on, so in that case, turn this “On” too as the impact is negligible in the RT scenes.
Ray Traced Particles
Similar to the above setting, this enables ray tracing against all particle effects, both reflections and shadows. Once again, since this option can only be enabled once an RT setting is turned on and most of the frame loss has already occurred, the actual impact from this option is only a 2% drop, so keep this “On” as well if RT options are turned on.

Upscaling Options: FSR 1, FSR 2, DLSS 2, XeSS Tested
The last bunch of settings to look at when optimizing a game. If your game is hitting the target frames with all the previous optimizations, these settings are not needed. But if your game is still struggling, this is the one to turn to.
Diablo 4 features the whole list of upscaling options, from AMD’s FSR to NVIDIA’s DLSS and also Intel’s XeSS. Let’s check out how they all perform. We removed the 1% lows metric to better fit everything.

Looking at the performance metrics below, we can see that AMD FSR 1’s “Performance” mode gives us the highest increase in frames, a whopping 181%. This is closely followed by FSR 2’s “Ultra Performance” mode at a 178% increase, and NVIDIA DLSS’s “Ultra Performance” mode at 166%. Considering we are using an NVIDIA GPU in our tests, this is an interesting conclusion to see.
Intel’s solution of XeSS is far down at a simple 87% increase at “Performance” mode.
Historically, NVIDIA’s DLSS solutions have had the least amount of artifacts present in the scaled images and as such, would be the recommended one. When picking one, your GPU obviously matters too. If you have an NVIDIA GPU, go with DLSS, if you have AMD, go with FSR and if you have intel, try XeSS.
In terms of which one to pick, start with the highest option always, usually labeled “Quality” and go down until you feel you’re getting enough frames. Do note that the lower you go, the messier and blurrier the upscaled images can look.
If you are using ray-tracing, keep the setting at “DLSS Quality” mode or “DLSS Balanced“.

The DLAA setting is useful to get an anti-aliasing option that looks good, at the expense of frames. Only use this if you can turn on Frame Generation to help raise frames back up, meaning you have a 40 series card. Otherwise, stay away from this setting to avoid unnecessary performance drops.
NVIDIA DLSS Frame Generation
And finally coming to DLSS Frame Generation, this setting is for you only if you have a 40 series NVIDIA GPU. This works really well if you can run it.

Frame generation can help boost frames to playable levels with the Ultra RT preset on the 4080 Super. Subsequently, turning it on with the DLSS upscaling mode set to “Quality” gives us the same frames as playing on the Ultra non-RT preset plain. Ergo, if you are using ray-tracing, your go-to option should be: Turn on DLSS Quality/Balanced, turn on DLSS Frame Generation. This unfortunately only works on the 40 series cards.
Finally, turning on frame gen without RT boosts frames by a nice 31% too, so consider keeping it on while playing if you have a 40 series card.
DO NOTE that this will also introduce higher latency to the gameplay, as the frames are only AI-generated and not actual frames in the game. This is also why the NVIDIA Reflex Low Latency option gets turned on by default on accessing this and cannot be turned off.
Diablo 4: CPU Bottleneck
If you’re playing Diablo IV at “Ultra” or “RT Ultra,” you’ll likely be completely GPU-bound. Only at 1080p “RT Ultra” and 1440p/4K “RT Ultra” with DLSS/FSR, we experienced a mild CPU bottleneck with a GPU-busy deviation of 20-30%. Reducing the graphics settings to “Low” or “Medium” similarly impacts the CPU-GPU dynamics.


Additional Settings
Under the “Connect” tab of the options, Disabling Cross-Network play has been shown to have lesser stutters and smoother gameplay. Consider turning this off if you’re experiencing inexplicable stutters while just moving around despite all the optimizations above.
Best PC Settings for Diablo 4?
With each setting analyzed in detail, let us apply all the optimized settings to the recommended levels for the defined PC configurations (And if you jumped here directly to quickly set things up too):
| High-end PC | Mid-Range PC | Low-end PC | |
|---|---|---|---|
| Resolution | 4K | 1440p | 1080p |
| Texture Quality | Ultra (16 GB VRAM) | High (12 GB VRAM) | Medium (8GB VRAM needed)/Low for <8 GB VRAM) |
| Anisotropic Filtering | 16x | 16x | 16x |
| Shader Quality | High | High | High |
| Geometric Complexity | High | High | High |
| Terrain Geometry Detail | High | High | High |
| Clutter | Highest | Highest | High/Medium |
| Fog Quality | High | Medium | Medium |
| Fur Quality | High | High | High |
| Reflection Quality | High | High | High |
| Screen Space Reflections | On | On | On |
| Anti-Aliasing Quality | High | High | High |
| Ambient Occlusion | Medium | Off | Off |
| Shadow Quality | High | High | Medium |
| Contact Shadows Quality | High | High | High |
| Particles Quality | High | High | High |
| Water Simulation Quality | Low | Low | Low |
| Physics Quality | High | High | Low |
| Distortion | On | Off | Off |
| Low FX | Off | Off | On |
| Upscaling | Native | DLSS or FSR 2 Quality | DLSS or FSR 2 Balanced/Performance |
| DLSS Frame Gen(40 series only) | On | On | On |
| Vertical Sync, Limit Cutscene FPS | Personal Choice | Personal Choice | Personal Choice |
| Max Foreground FPS | 400 | 400 | 400 |
The following ray-tracing settings are for NVIDIA RTX users only. Folks with a Radeon or a GTX card are advised to turn RT off. It is recommended to keep all RT off if you’re struggling with frames. You will NEED to use upscaling options and frame gen (if possible) with the following settings.
| High-end | Mid-range | Low-end (1080p) | |
|---|---|---|---|
| Ray Traced Shadows Quality | High | Medium | Low |
| Ray Traced Reflections Quality | High | High | High |
| Ray Traced Foliage | On | On | On |
| Ray Traced Particles | On | On | On |
| Upscaling Option | DLSS Quality | DLSS Quality | DLSS Balanced/Performance |
| Frame Generation (40 series only) | On | On | On |
Here are our definitions of High-end, Midrange, and Low-end PCs:
| High-end | Mid-range | Low-end | |
|---|---|---|---|
| CPU | Core i7-13700K/Ryzen 7 7800X3D | Core i5-13600K/Ryzen 5 7600X | Less than: Core i5-12400/Ryzen 5 3600 |
| GPU | RTX 4070 Ti Super/RX 7900 XT | RTX 4070/RX 7800 XT | Less than: RTX 4060/RX 7600 |
| Memory | 32GB (dual-channel) | 16GB (dual-channel) | Less than: 16GB (dual-channel) |