XDefiant is Ubisoft’s foray into the free-to-play competitive PvP FPS market, pulling in factions, characters, and maps from its established game universes (Splinter Cell, The Division, and Watch Dogs). Released this year on May 21st, the game utilizes Ubisoft’s gorgeous Snowdrop engine, their most advanced engine powering games like Avatar, The Division 2, and the upcoming Star Wars Outlaws.
Currently Ubisoft’s biggest launch in history according to unique player count statistics, XDefiant is poised to be the “next Call of Duty” killer with the very first Season planned to launch on July 2nd. In this guide, we’ll go through every graphics setting and benchmark every option, to recommend the best graphics settings for XDefiant on PC.

The recommended options you can pick based on your PC’s power level (defined near the end of the article) and your FPS target (60, 144, or 240) will be showcased at the end.
Let’s start by looking at the official PC requirements. The following tests were conducted in the “Practice Zone” Map by running, gunning, and shooting flames through the Assault Course repeatedly, using the “Cleaner” class while benching it.


XDefiant Official PC System Requirements
To run the game at the “Low” preset settings at 1080p 60 FPS you require at least an Intel Core i7-4790K or AMD Ryzen 5 1600 (If you’re using an ARC GPU however, you’ll need Intel Core i3-10105F or the AMD Ryzen 3 3100). Pair that with at least an Intel ARC A380 (6GB with ReBar ON), NVIDIA GTX 1050Ti (4GB) or the AMD RX 5500 XT (4GB). Finish it with at least 8 GB of Dual Channel RAM and 35 GB of storage space, preferably an SSD.
Pushing it up to the recommended settings, corresponding to a “High” preset level at 1080p 60 FPS, you need an Intel Core i7-4790K or AMD Ryzen 5 1600, (Intel Core i3-10105F or the AMD Ryzen 3 3100 for Intel ARC GPU) paired with the Intel ARC A750 (8GB with ReBar ON), NVIDIA GTX 1060 (6GB) or the AMD RX 5500 XT (8GB) or higher. Top it off with 16 GB of Dual Channel RAM and 35 GB of storage space.
The game also offers specs for higher settings:
“Enthusiast” for 1440p 60 FPS High Graphics Preset
- CPU: Intel i5-10400 / AMD Ryzen 5 3600
- Graphics: Intel ARC A770 (16GB with ReBar ON); NVIDIA RTX 2060 (6GB); AMD RX 5600 XT (6GB)
- RAM Memory:16 GB Dual Channel
- Storage: 35 GB
“Ultra” for 4K 60 FPS High Graphics Preset
- CPU: Intel i7-9700K / AMD Ryzen 7 3700X
- Graphics: NVIDIA RTX 3080 (10GB) / AMD RX 6800 XT (16GB)
- RAM Memory:16 GB Dual Channel
- Storage: 35 GB
Our Test Bench
- CPU: Intel Core i7-14700KF.
- Motherboard: GIGABYTE Z790 Gaming X AX.
- Cooler: Asus ROG Strix LC II 360.
- GPU: NVIDIA GeForce RTX 4080 Super.
- Memory: 16GB x2 DDR5-6000 CL36.
- Power Supply: Corsair RM1000e.
Windows/ System Settings to Optimize
Before we dive into optimizing the game, we recommend configuring certain Windows and Display settings for the best performance before we even boot in. This should be standard for every game. First, make sure all unnecessary applications are closed.
Use “Ctrl + Shift + Esc” to open up Task Manager and turn off any applications you’re not using. Things like WhatsApp or Epic Games, etc tend to run in the background, shut them down. Do not touch the ones under “Windows Processes” though.
Enable Resizable BAR (SAM)
Resizable BAR was enabled on most x86 motherboards and GPUs following the adoption of the PCIe Gen 4 standard. Traditionally, the CPU and GPU have communicated through a narrow BAR (a 256 MB window), constantly moved around to allow the CPU to access different parts of the graphics memory. Resizable BAR allows the CPU full access to the GPU’s memory bus rather than a small portion.

Intel’s 10th Gen CPUs and newer support Resize BAR, while AMD’s Ryzen 3000 chips and onward also support it. On the GPU side, NVIDIA’s GeForce RTX 30 series and newer feature Resizable BAR support. The Radeon RX 6000 cards were the first to enable it on the opposite side.
Enabling Resizable BAR usually involves turning on two PCIe technologies from the motherboard BIOS: Above 4G Decoding, and Resizable BAR support. The ASUS, Gigabyte, and MSI motherboard guides are linked for further instructions.
Hardware Accelerated GPU Scheduling and Windowed Optimizations
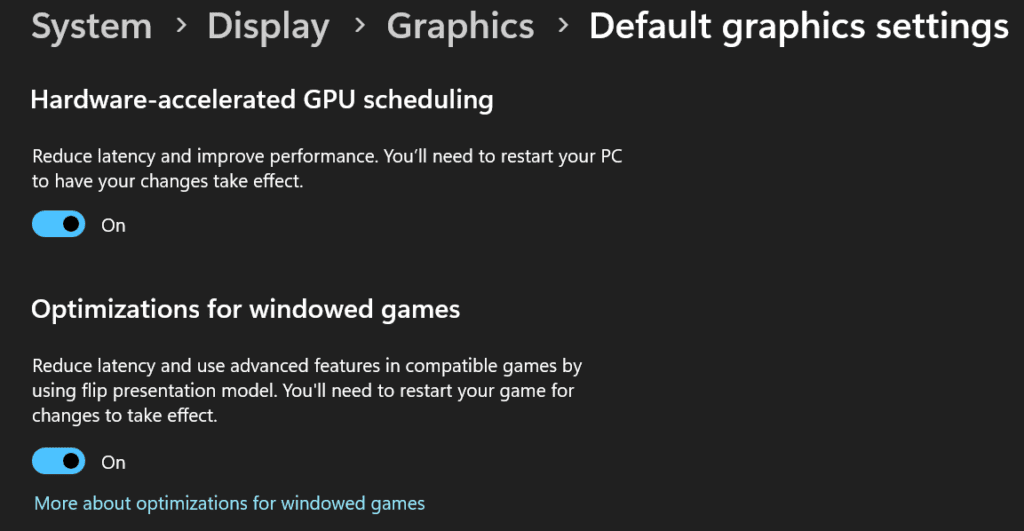
Next, ensure you have “Optimizations for windowed games” enabled in your Windows settings as this will help with latency and thread priorities. To get there, open System Settings (Right-click on the Windows logo and click settings) -> Display -> Graphics -> Default graphics settings and enable both options.
Xbox Game Bar
Now go into the “Gaming” Setting from the sidebar. Click on Game Mode and make sure it is turned on. Next, in the “Captures Setting,” turn off all the options if you don’t intend to take screenshots or record the game. 
If you’re playing on a laptop, make sure the power plan is turned to “High Performance” or equivalent and the correct GPU is selected, either in the Windows settings or the inbuilt app (such as the Alienware app). And always keep it plugged in while gaming unless that’s not an option. Finally, open the NVIDIA or AMD companion app and make sure the latest drivers are installed.
With that out of the way, let’s proceed to the display and graphics settings within the game. We’ll analyze each setting under the “Graphics” tab. The other tabs do not affect the performance. We’ll start with the “Basic” Options.
Overclock your Graphics Card
Overclocking GPUs is a fairly safe and easy process. If done right, it won’t void your warranty and can boost your gaming performance by at least 5-10%. Unlike CPUs, you don’t have to mess with the BIOS or worry about BSODs. All you need is MSI Afterburner or EVGA Precision X (they work with GeForce and Radeon cards regardless of the AIB):

- MSI Afterburner.
- GPU-Z
- Games you play often, preferably a recent release that will stress the GPU.
- Here’s a guide to get you started.
Enable XMP/EXPO Memory Profile
XMP profiles (EXPO for AMD Ryzen platforms) are a set of predetermined memory clocks and timings known to run stably on a given memory die. They’re a shortcut to overclocking your memory without testing every frequency and timing.
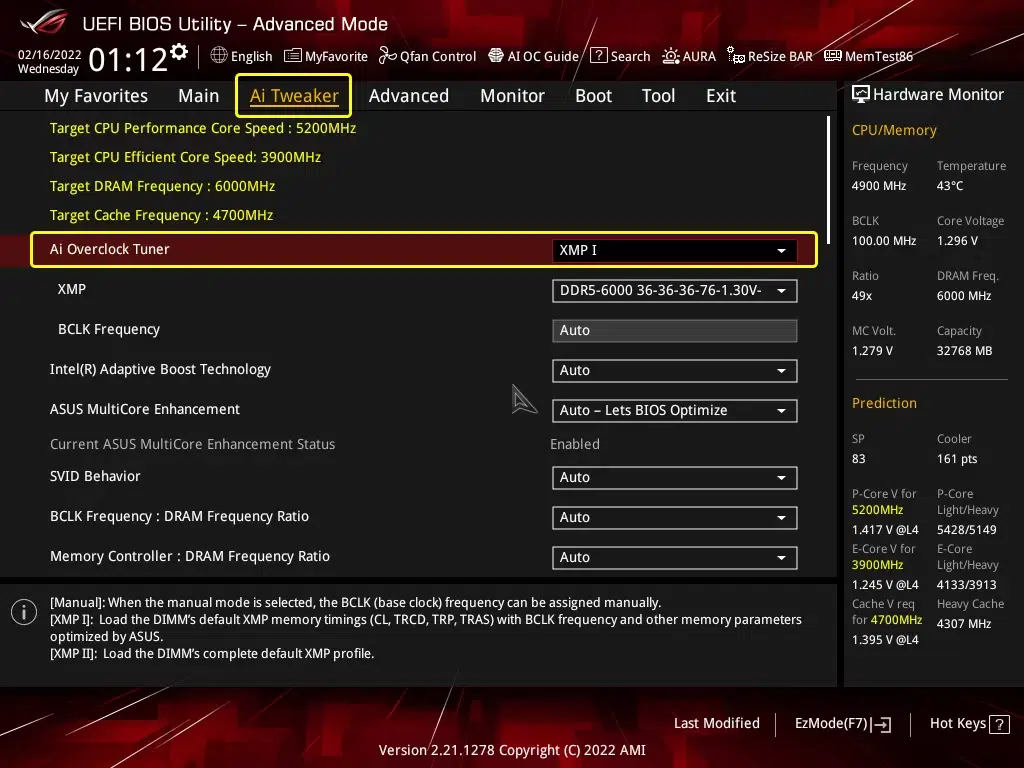
Most motherboard BIOSes include this setting on the BIOS homepage, under one of the following: Extreme Memory Profile, AI Overclock Tuner, Load XMP Profile, EXPO, A-XMP, or DRAM Profile. Further instructions are linked.
Note: You can turn on the “FPS Display” and a few other metrics over in the “Gameplay & UI” menu in the Settings. Make sure to keep this on if you don’t have any other overlays and want to check the FPS you are getting while optimizing and turn it off later if needed.
Display Mode
Keep this at “Fullscreen“. This ensures the game gets maximum performance and other apps do not distract from it. Other display modes can lead to stutters and unwanted FPS drops.
Resolution Scaling: 1080p vs. 1440p vs. 4K Benchmarks
Note: The “Max” setting is everything in the graphics options set to the maximum possible value. By default, even the game’s “Ultra” setting doesn’t max out every setting, plus enables V-Sync by default which we disabled for the testing processes. We’ll use this “Max” option as the reference preset.
Changing resolutions is the first thing to do when optimizing a game. You should use the resolution that matches your monitor’s. But it also depends on your system. As a thumb-rule, a higher-end system should target 4K, mid-range 1440p, and low-end 1080p. However, if you are playing competitively, you will want to prioritize frames over resolution and try keeping it closer to 1080p (or even lower if needed).
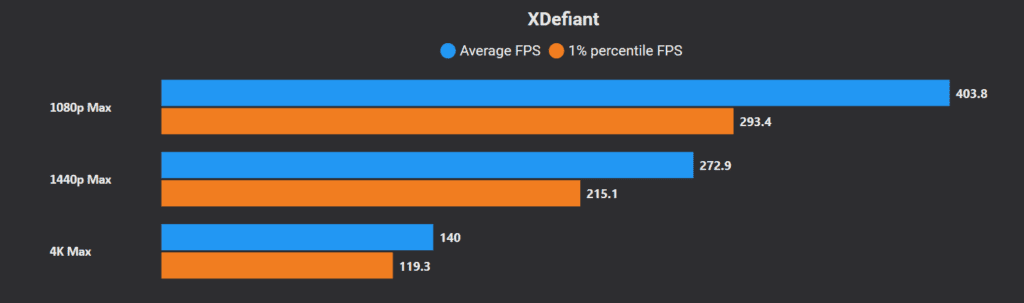
We benched our highest preset, “Max”. Switching from 4K to 1440p, the performance increases by 95%, and from 4K to 1080p, it increases by 188%. From 1440p to 1080p, that’s a 48% increase. The age-old adage is of course true, lower resolution means better frames. Keep it at your monitor’s resolution and only change it if all else fails.
Other “Video Settings”
- Refresh Rate: Keep this at the maximum possible value for your monitor.
- Display Monitor: Choose the primary monitor that you use for gaming.
- Brightness: Personal Preference
- Contrast: Personal Preference.
Best Graphics Preset for XDefiant
Once the target resolution has been selected, we can start with optimizations to increase our frames. We’ll look at the “Resolution Scale” option near the end as that is something only to be touched when all else fails. The HDR options are also personal preferences and don’t impact performance.

XDefiant has four presets going from “Low”, “Medium”, “High” and “Ultra”. As mentioned, “Max” is our preset with every setting maxed out for reference. Let’s see how they stack up.
The GeForce RTX 4080 Super (and the Core i7-14700KF) manage an average of 139.8 FPS at the 4K “Ultra” setting in XDefiant. The following are the presets ranked in percentage gains going down from the “4K Ultra” preset to the “4K Low” Preset:
- Max: None
- High: 49%
- Medium: 82%
- Low: 187%
Try out the preset that nets your target frames (be it 60, 144, or 240) and we’ll proceed to toggle each option to maximize frames while maintaining visual fidelity and a competitive advantage in the coming sections.
V-Sync Mode and Framerate Limit
V-Sync helps synchronize frames with your monitor’s refresh rate to help prevent screen-tearing, at the cost of added latency. Only turn this on if you’re getting noticeable screen tears, otherwise, keep this “off” to get an uncapped refresh rate and lower latency.
Framerate Limit helps prevent jitters due to framerate fluctuations to achieve consistent graphics and network performance. Keep this “off“, unless you’re getting constant stutters. In that case, turn it on and keep it slightly above your monitor’s refresh rate to get the best experience possible. This only goes up to 200, and won’t help with 240 Hz or higher refresh rates.
Shadow Quality
Shadow Quality controls the resolution and quality of the shadow maps used in-game. This setting controls both the dynamic shadows for objects and characters as well as the sun-casted shadows. Going from Very High to Low decreases the resolution and quality of shadow maps, but dynamic shadows from players are maintained at any setting to provide fair play, and hence can’t be turned off.
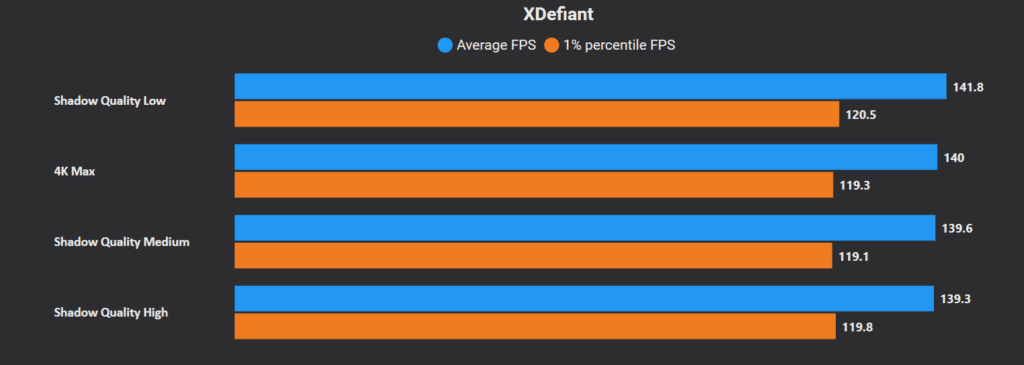
Going down from Max, the gains are:
- High: 0%
- Medium: 0%
- Low: 1.3%
We see barely any difference between the high-end options, while Low brings us an FPS boost.
- Visual Fidelity: “High“, there’s no benefit to turning it down here.
- Competitive: “Low“. As mentioned before, player shadows are still maintained and you get the maximum FPS boost, plus like in Spot Shadows, lesser environmental shadows mean the players are easier to notice in darker areas or hiding in corners of buildings for easier pickings.
Spot Shadows
Spot, or spotlight shadows, sets the number of spotlight shadows that can appear onscreen. These are shadows cast by individual static light sources, so more shadows being cast gets more taxing on the GPU.
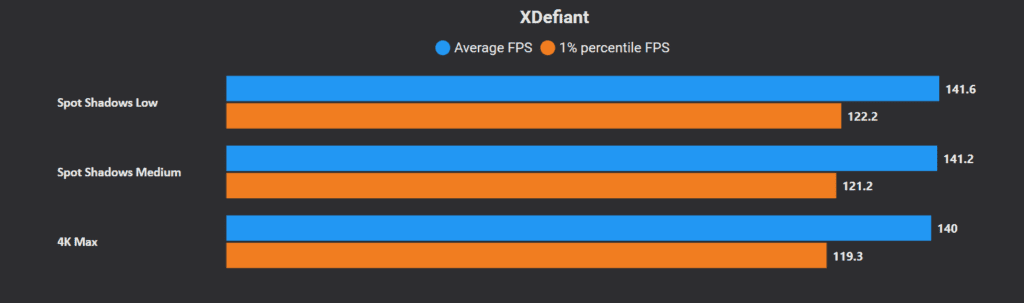
Going down from the High Spot Shadows settings, we get the following gains:
- Medium: 0.9%
- Low: 1.1%
- Visual Fidelity: Stick with “Medium“.
- Competitive: “Low“. A lack of spot shadows means the enemies are easier to see, as areas won’t get darkened. Remember, none of these settings affect the player shadows to keep it fair, and only affect environmental object shadows.
Spot Shadow Resolution
This setting adjusts the resolution of the shadow maps The low and medium settings contain artifacts and look jagged.
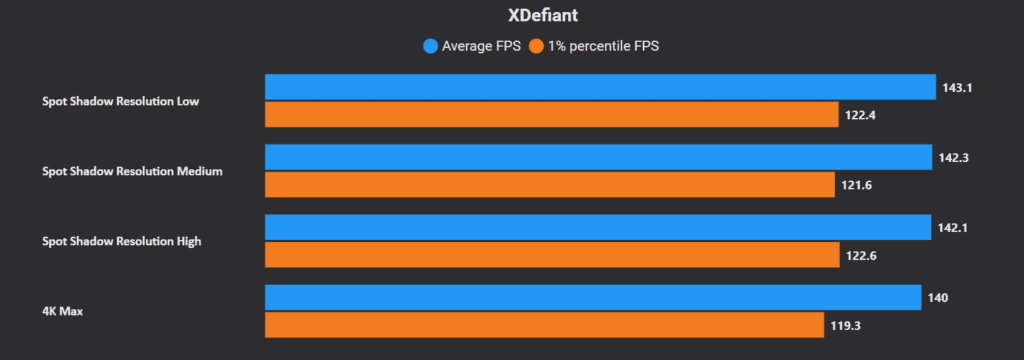
Going down from Max, the gains are:
- High: 1.5%
- Medium: 1.6%
- Low: 2.2%
- Visual Fidelity: “High” to get a healthy FPS boost while avoiding jagged edges in shadows.
- Competitive: “Low” to get the maximum FPS boost.
Contact Shadows
Contact shadows improve the shadow quality and accuracy, and are similar to ambient occlusion except not baked in but real-time. They calculate the screen space lighting on a per-pixel and per-light basis, helping objects feel grounded rather than floating. Consequently, it’s more taxing in areas with more light sources.
Here, the “Off” setting removes all contact shadows, “Sun Low” keeps only the contact shadows from the sunlight, “All Low” keeps contact shadows from all light sources but at a lower resolution while “All High” keeps it all high res.
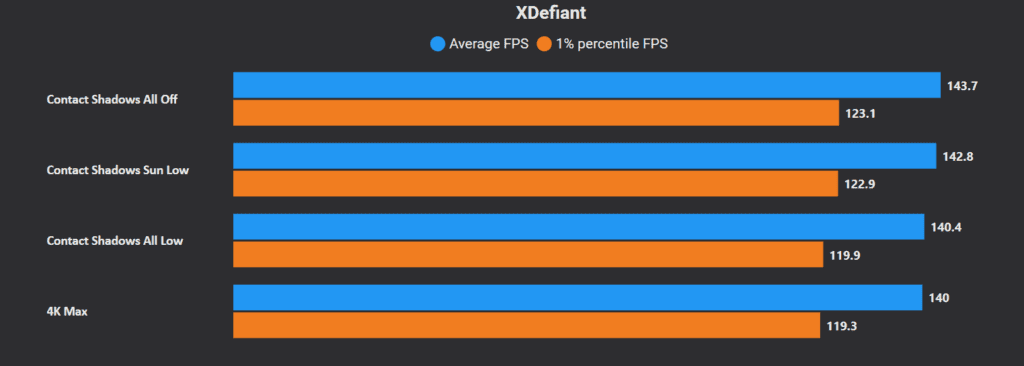
As before, this does not impact any player shadows to keep it fair. Going down from “All High”, we get:
- All Low: 0.3%
- Sun Low: 2%
- All Off: 2.6%
- Visual Fidelity: Keep this at “All Low” for the perfect balance of all contact shadows and some frames.
- Competitive: “Off“. No contact shadows? The enemy is more exposed! Also, huge frames.
Particle Detail
This setting adjusts the particle density and the quality of particle effects emitted by particle systems, such as the ones from bullets, grenades, fires, etc. The higher the setting, the more particles present in the scene.
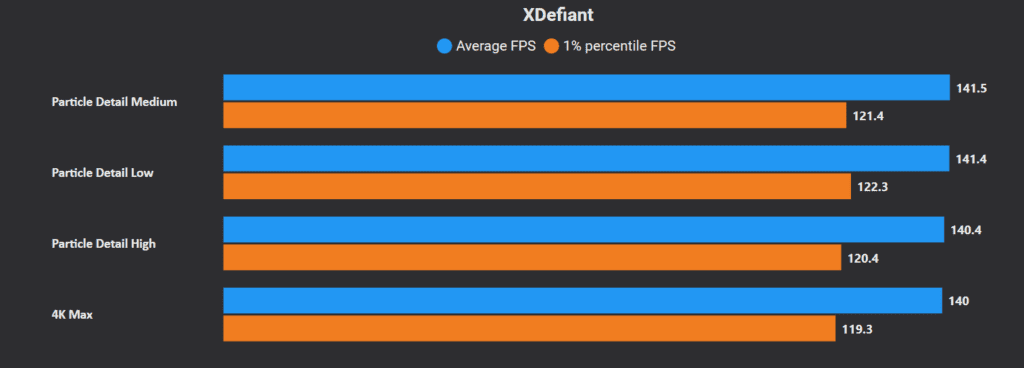
As seen above, Ultra and High lie in a similar range, while Medium and Low lie in their range with a significant FPS boost. Going down from Ultra, the gains here are:
- High: 0.3%
- Medium: 1.1%
- Low: 1%
- Visual Fidelity: “High” to account for extra dips due to more explosions etc while maintaining a healthy particle density and quality.
- Competitive: “Low” as there’ll always be instances where particle counts abruptly increase and we want the least impact possible.
Volumetric Fog
This setting modifies the resolution and quality of volumetric fog to create clearer light shafts and fog effects, noticeable in places where a bulb or the sun shines through the foggy areas.
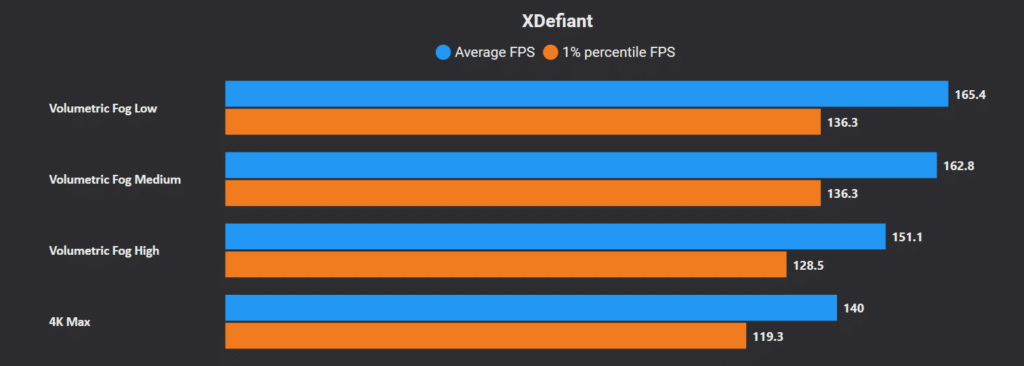
As seen above, this setting has a massive impact on frames compared to the other settings. Going down from Ultra we get the following benefits:
- High: 8%
- Medium: 16%
- Low: 18%
- Visual Fidelity: “Medium” for a significant FPS increase while maintaining a decent fog cover.
- Competitive: “Low” to get the highest frames. Additionally, no fogginess means easier enemy detection. This does not affect smokes and other player-made effects.
Global Reflection Quality
Global Reflection Quality controls the reflection details in the environment by setting the rendering frequency and resolution of global scene reflections produced by large objects, such as tall buildings and scenery. At low and above, we get access to cube maps in the reflections. (No ray tracing is available in this game)
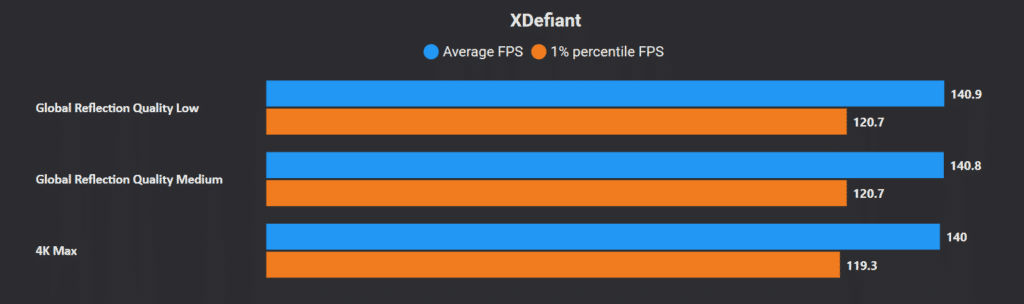
As seen above, you get a slight FPS increase in turning it down, by around 0.6%. This setting does not affect player reflections.
- Visual Fidelity: “Medium” for a significant FPS increase while maintaining a healthy reflection amount.
- Competitive: “Low” to get the highest frames and least environmental reflections as distractions.
Local Reflection Quality
Local Reflection Quality is similar to the previous setting, except instead of larger objects, this is for nearby smaller objects and screen space reflections in puddles, etc. The lowest “Off” setting disables all reflections here, including player reflections.
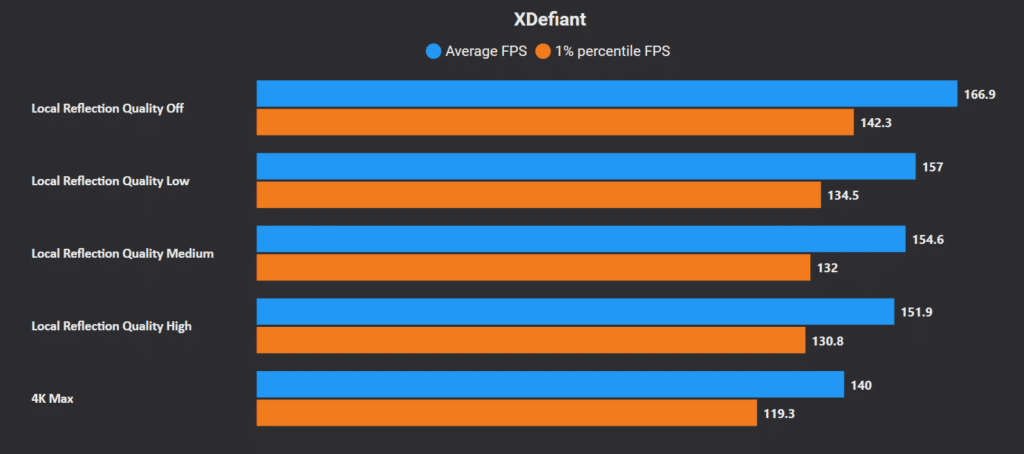
Going down from “Very High” to “Off” we get the following gains:
- High: 8.5%
- Medium: 10.4%
- Low: 12.1%
- Off: 19.2%
- Visual Fidelity: “Medium” for a significant FPS increase while maintaining a healthy reflection amount.
- Competitive: “Low” to keep player reflections intact. Turning this “Off” is an option if you feel player reflections will not affect your competitive ability as there’s a big FPS jump of 6%.
Vegetation Quality
The vegetation quality setting in this game doesn’t seem to affect the vegetation density or pop-in distance, but rather just the resolution and ambient occlusion levels.
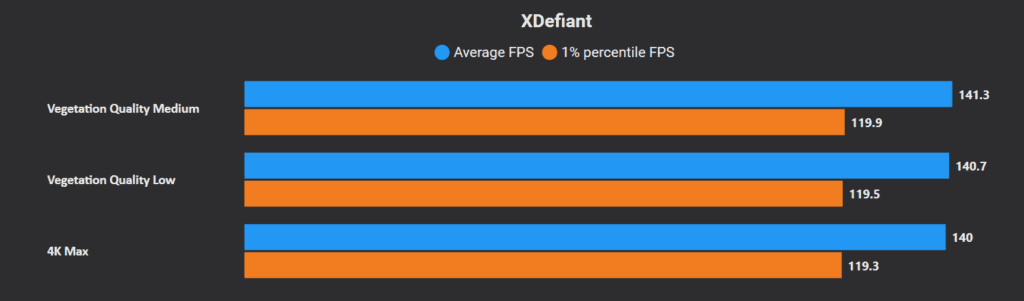
- Visual Fidelity: “High” to keep that grass green and frames unchanged.
- Competitive: “Low” just to stay on the safer side of the holy frames.
Sub-Surface Scattering
Controls the transmission of light through translucent objects, such as skin or plastics.
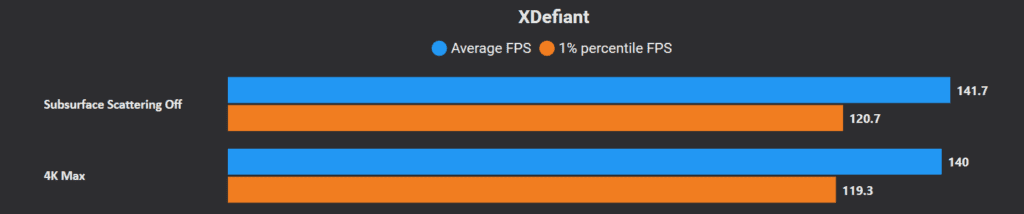
There’s a surprising 1.2% increase in frames upon turning this off. It’s recommended to keep this “Off” in visual fidelity and competitive scenarios as you won’t notice it in regular gameplay.
Ambient Occlusion
Ambient occlusion is the soft shadows and indirect lighting from the environment, typically using Screen Space Ambient Occlusion (SSAO). In this game, it enhances the quality of the ambient shadows through shadow resolution scaling and there’s no setting to turn it off.
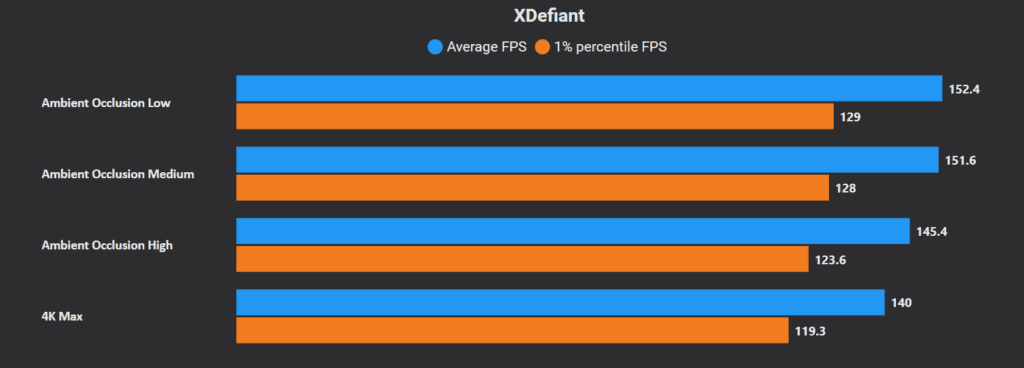
Turning down AO has a significant FPS boost, in the following ranges:
- High: 4%
- Medium: 8%
- Low: 9%
- Visual Fidelity: “Medium” to get a healthy FPS boost while maintaining decent AO.
- Competitive: “Low” for max FPS boost as players or their shadows are not affected by this.
Object Detail
This setting controls the level of detail by changing the polygon count in the meshes of the objects in the game. This affects the 3D depth detail of items, which is different from texture quality. The higher the setting, the more detailed the object’s geometry, and the higher the CPU load.
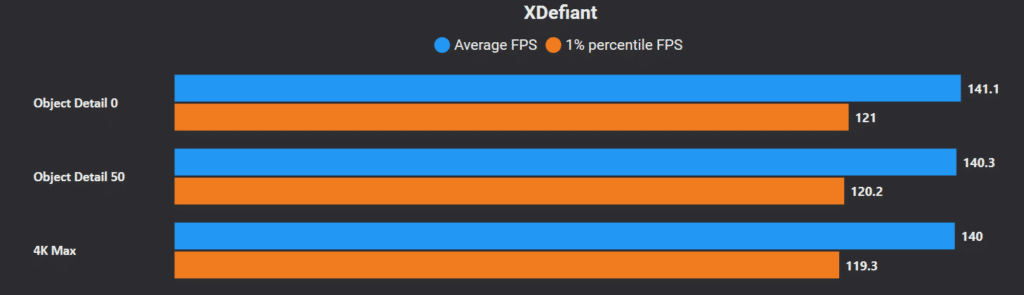
As seen above, going down from 100 doesn’t grant any notable gains.
- Visual Fidelity: “Between 100 to 60“
- Competitive: “Between 50 to 10” as going too low will result in low poly objects and improper shadowing, resulting in a disadvantage.
Extra Streaming Distance
This setting controls the distance at which objects will get rendered or drawn into view. A lower setting means a nearer render distance, which means faraway objects will not be rendered and will pop in more. An important thing to note is that this does not affect the distance at which you can see players.
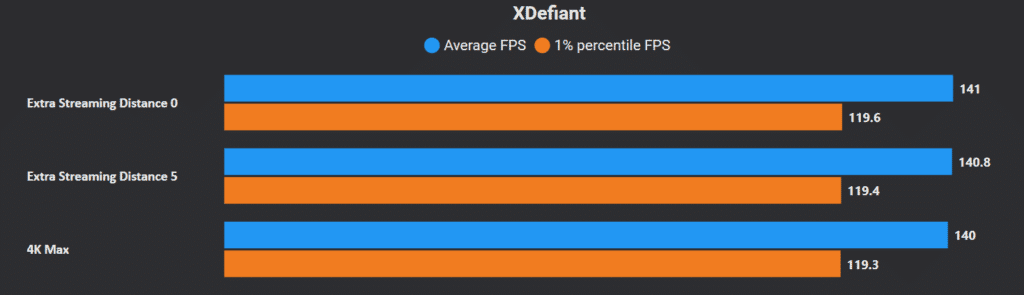
This setting is mainly memory intensive (VRAM and RAM both), so lowering this is only necessary if there are memory limitations.
- Visual Fidelity: “Between 6-10” depending on your memory budget.
- Competitive: “Between 0-5“, having this at 0 has no drawbacks and will save maximum memory.
Water Quality
This setting changes the level of water simulation physics and realistic translucency.
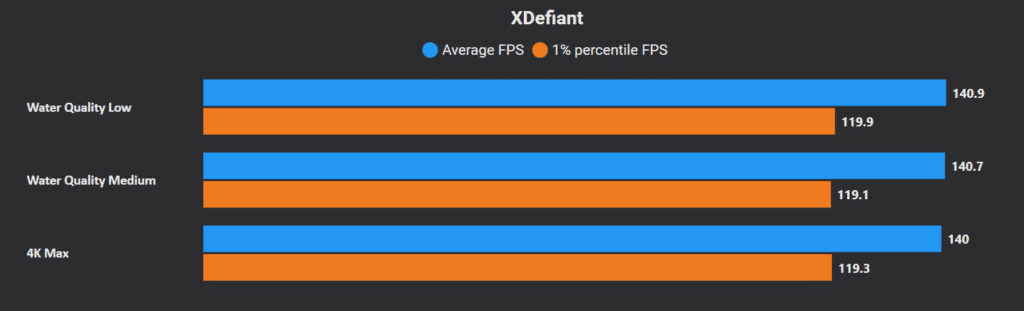
The Practice Zone doesn’t have much water, yet we saw a slight performance increase. It’ll be only more noticeable on the other maps.
- Visual Fidelity: “Medium“
- Competitive: “Low or Medium” depending on how much you can use water physics such as from footsteps for a competitive advantage.
Terrain Quality
This one adjusts the “fidelity” or quality of the terrain. This means uglier rocks that jut out more against sand with lower-resolution textures.
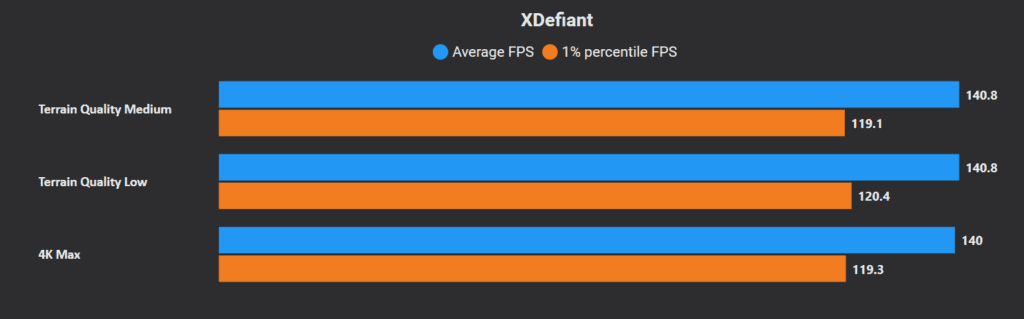
This setting doesn’t impact performance.
- Visual Fidelity: “High“
- Competitive: “Medium“
Sharpening, Lens Flare, Chromatic Aberration
- Sharpen makes everything, well, sharper. This means that blurriness induced due to anti-aliasing and other factors can be eliminated, and enemies can be easier to spot. But this ultimately comes down to personal preference. Stick to what you prefer.
- Lens Flare turns on/off the simulation of the internal reflections and scattering of light caused by a camera lens’s non-uniform optical characteristics.
- In other words, the shiny circle things we see when looking at the sun, etc. No performance impact at all.
- It’s recommended to keep it “Off” to avoid unnecessary flashes, but it’s a personal preference.
- Chromatic Aberration has no FPS impact either and is purely a personal preference.
DirectX Version and CPU bottlenecks
XDefiant includes DX11 and DX12.
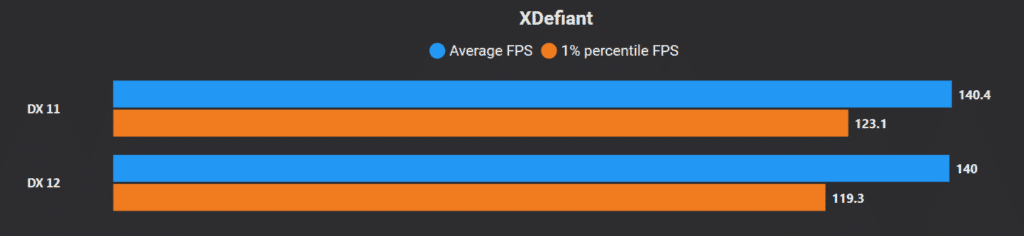
At first glance, it may appear DX 11 is giving us higher frames here. Let’s have a deeper look.
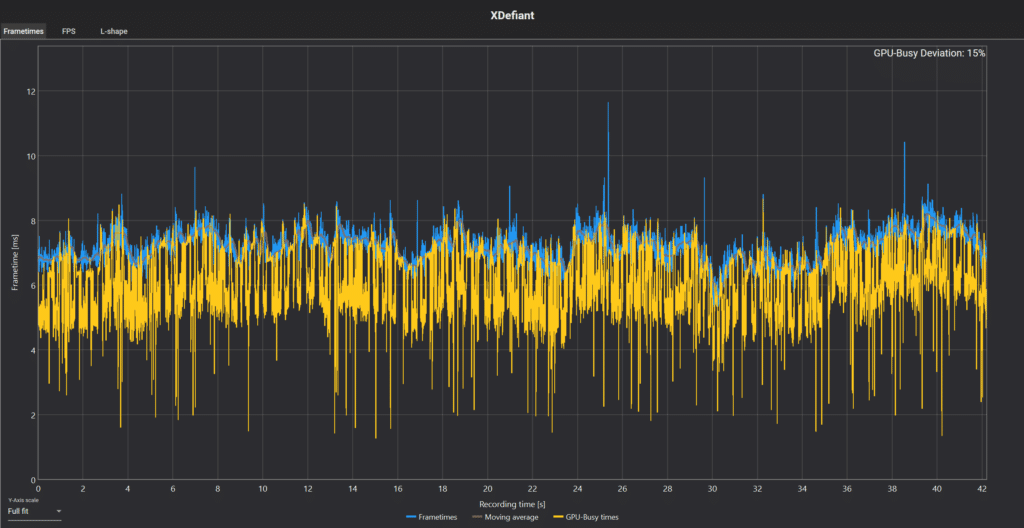
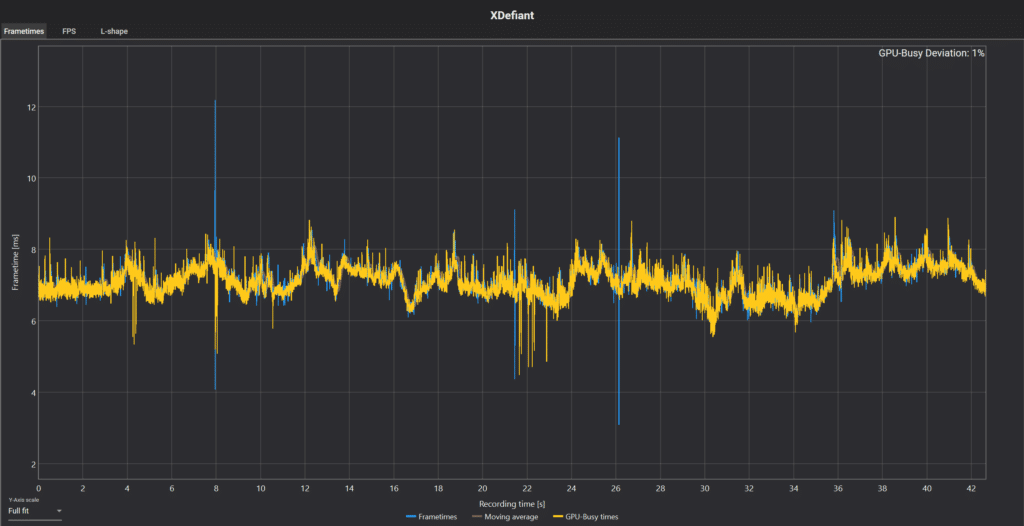
The yellow lines indicate the “GPU-Busy Deviation”, which says how long the GPU had to wait for the CPU to hand it data, representing a CPU bottleneck. In DX12, we have a consistent “15%” GPU-Busy Deviation, while DX 11 only has a mere “1%.” We also noticed significantly less VRAM and RAM usage with DX11 on our systems.
The results may vary from system to system, but we recommend using “DX11” (ie keep DX12 off) for the best performance and FPS boost with lesser memory usage. However, if you experience stutters with DX11, switch back to DX12 as it is supposed to be more stable on modern systems.
Resolution Scale
Resolution scaling is a way to massively increase performance at the cost of resolution (added blurriness in upscaling). We’ve kept this at the end since it is always recommended to play at native. If you are still struggling with frames after trying out all the optimized settings above, it is time to try upscaling.
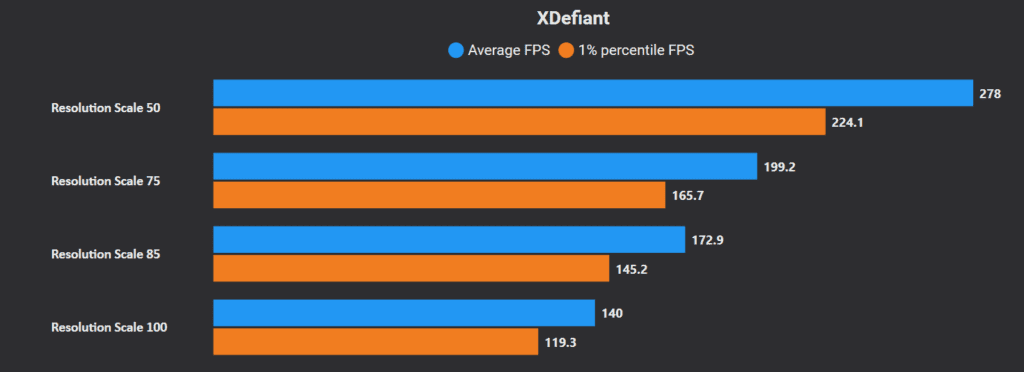
By default, the game starts at a Render Scale of “100”, which means it is rendering at the native resolution. Going down from 100 we get the following boosts:
- 85: 23%
- 75: 42%
- 50: 100%
So if you’re struggling with performance after all the previous optimizations, reduce it to 85. If you need higher framerates still, reduce it to 75 and 50 and check your FPS Do note that you want to keep this as high as possible and find the sweet spot that nets you your target FPS. Too low will be too blurry and a disadvantage.
Triple Buffering, Reduced Latency, NVIDIA Reflex
- Triple Buffering improves framerate stability but adds a small amount of input latency. In our tests, the FPS improvement was not worth the loss of latency, so keep this “Off“
- Reduced Latency is supposed to reduce input latency at the cost of frames. Turning this off resulted in a minor FPS increase but a much bigger CPU bottleneck. Keep this “On“
- We got a “28%” GPU-Busy Deviation on turning Reduced Latency Off, compared to “15%” when on.
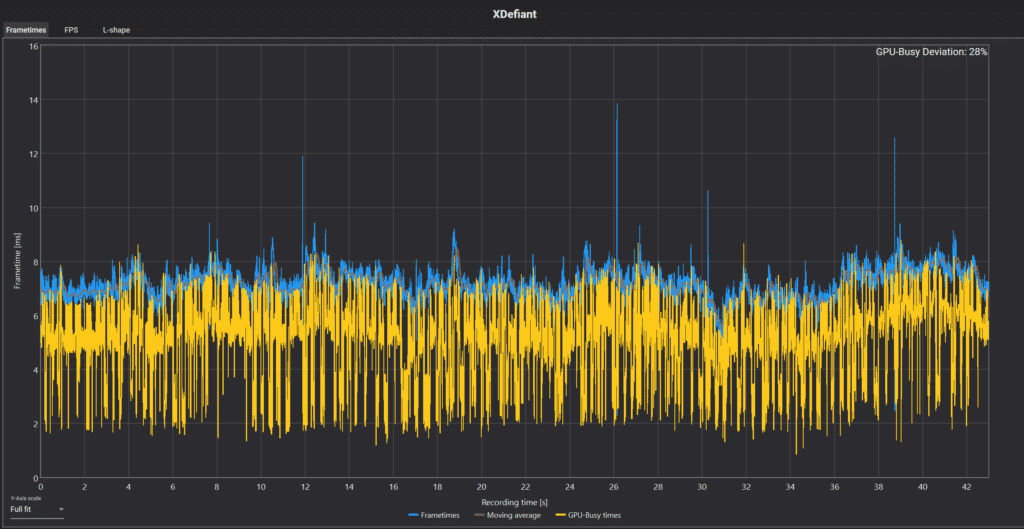
NVIDIA Reflex Low Latency is an NVIDIA GPU-only solution similar to the last option. This further reduces input latency. “On + Boost” increases GPU power draw by optimizing latency even in CPU-bound cases. In our tests, turning this off led to the least CPU bottleneck of 1%, On gave us 7% and On+Boost gave us 15%. The FPS had no changes either. Keep this at “On + Boost” or at least “On” if you have an NVIDIA GPU.
Additional Settings
Under Documents -> My Games -> XDefiant there should be a file named “bc_gfx_settings_unauthenticated” which can be opened with Notepad.
This file contains information on the current graphics settings which can be changed beyond the in-game menu. The game automatically recreates this file every time it’s launched, so there’s no need for a backup. The trick is to right-click, go into properties, and change it to “read-only” after you’re done. That way, the game cannot change it on launch.
In our testing, changing “fog = 2” to “fog = 0” and “parallax mapping2″ to false helped slightly increase frames. We tried lowering the shadow qualities but that resulted in a buggy experience.
Interestingly, we find here the settings for “rtgi” (ray-traced global illumination), “rtreflections“, and “rtshadows“, all turned off by default. Turning this on here appears to enable ray tracing in the game. Feel free to play around with it, however, we recommend keeping it off to avoid glitches and better performance.
Best PC Settings for XDefiant in 2024?
Here are the optimized settings for high-end and low-end PC configurations targeting 60 to 240 FPS:
| High-end | Midrange | Low-end | |
|---|---|---|---|
| Resolution | 4K 144 FPS 1440p 240 FPS | 1440p 144 FPS 1080p 240 FPS | 1080p 144 FPS |
| Display Mode | Fullscreen | Fullscreen | Fullscreen |
| Refresh Rate | Highest | Highest | Highest |
| Triple Buffering | On | Off | Off |
| Reduced Latency | On | On | On |
| NVIDIA Reflex Low Latency | On + Boost | On + Boost | On + Boost |
| DX12 Renderer | On | Off | Off |
| V-Sync | Disabled | Disabled | Disabled |
| Framerate Limit | Off | Off | Off |
| Shadow Quality | Ultra | High | Low |
| Spot Shadows | High | Medium | Low |
| Spot Shadow Resolution | High | Medium | Low |
| Contact Shadows | All High | All Low | Off |
| Particle Detail | High | Medium | Low |
| Volumetric Fog | High | Medium | Low |
| Global Reflection Quality | High | Medium | Low |
| Local Reflection Quality | High | Medium | Low |
| Vegetation Quality | High | High | Low |
| Sub-Surface Scattering | On | Off | Off |
| Ambient Occlusion | Very High | Medium | Low |
| Object Detail | 100 | 60-100 | 10-50 |
| Extra Streaming Distance | 10 | 6-10 | 0-5 |
| Water Quality | High | Medium | Medium/Low |
| Terrain Quality | High | High | Medium |
| Sharpening | Personal Choice | Personal Choice | Personal Choice |
| Lens Flare | Personal Choice | Personal Choice | Personal Choice |
| Chromatic Aberration | Personal Choice | Personal Choice | Personal Choice |
| Resolution Scale | 100 | 100 | 85 or lower |
Here are our definitions of High-end, Midrange, and Low-end PCs:
| High-end | Mid-range | Low-end | |
|---|---|---|---|
| CPU | Core i7-13700K/Ryzen 7 7800X3D | Core i5-13600K/Ryzen 5 7600X | Less than: Core i5-12400/Ryzen 5 3600 |
| GPU | RTX 4070 Ti Super/RX 7900 XT | RTX 4070/RX 7800 XT | Less than: RTX 4060/RX 7600 |
| Memory | 32GB (dual-channel) | 16GB (dual-channel) | Less than: 16GB (dual-channel) |